
During my PWK training, I absolutely fell in love with KeepNote. I used it extensively for tracking all the different networks, all the hosts in that network, all the different scan results and loot I’d collect on each, and also general notes about attack vectors I had tried, what worked, what didn’t work, what to explore, little code snippets or Linux commands for easy copy-and-paste use later, links to helpful articles…you get the picture.
Unfortunately, KeepNote isn’t very well-maintained. As of this Fourth of July, the latest versions uploaded to the main site are five years old. The original developer did put it on Github two years ago, but there haven’t been many pull requests accepted since then and he obviously doesn’t have the time to keep up with it anymore. Totally understandable, but it sucks because I haven’t found a good, well-maintained replacement for it.
And believe me, I’ve tried! Evernote, Bear, nvALT, desktop wikis like Zim, the macOS Notes app, and on and on. No one else is doing, or even offering an option to do, the same kind of UI layout. I don’t know why, but the three-pane arrangement of KeepNote just hits the spot for me. The outline on the left side, submenu on top right, and notes section on bottom left; no one else arranges their app like this.

For real, this is my happy place.
Even after finishing the OSCP, I still use KeepNote for everything from CTFs to client engagements. It works fine in Linux and is even included in the package managers of Debian and several other distributions.
On Mac…eh, not so much! Getting the dependencies right is a little frustrating, at least if you’re using Homebrew. For example, KeepNote requires PyGTK and Glade…but you have to install Glade with PyGTK (brew install –with-libglade pygtk). If you install the packages separately, it won’t run. Most frustrating of all is that, once you do get it running, the clipboard doesn’t work right! You can’t copy or paste anything into or out of the app, for whatever reason.
“So why not just use it in Kali?” you might be asking. And I do, all the time. But recently, I had a huge internal pentest engagement for a client with several internal Class A networks. The only way to access this client was through a macOS VM running in VMware Fusion that was set up with their VPN and other software. I don’t know why, but macOS VMs run like shit. I was doing all this on a 2015 MacBook Pro with an i7 and 16 GB of RAM, and even with ample system resources, opening a second VM (with Kali on it) caused the macOS one to slow to a crawl…even though the internal Activity Monitor said everything was fine and system utilization was low. I’m guessing it has something to do with the subpar VMware Tools available for macOS, which doesn’t support 3D acceleration and some other features. And I’m sure macOS being a closed-source operating system that’s tied to branded hardware doesn’t help matters either.
A couple of Class A subnets is a lot of ground to cover and I wasn’t given a lot of time to dive deep, so I was constantly bounce from host to host to test out this or that weak point and having a hard time keeping up with the notes. Given the aforementioned VM troubles, my note-taking app was going to have to either run on the VM or my host OS, both of which are macOS Sierra.
While I entertained exploring the intricacies of Python and macOS clipboard operation and trying to write a patch myself, a much easier thought occurred to me: KeepNote is available as a pre-compiled installable Windows app!
I’ve had a lot of good luck with Wine on Mac, especially since they developed the Mac-specific driver for it and you don’t have to be shackled to XQuartz anymore. So I tried a few different ways to get KeepNote running inside macOS and here are my results.
TL;DR – The Easiest (and Nicest Looking) Way: WineBottler
WineBottler is a great little program for creating pretty wrappers around Wine apps. This way, it’ll package KeepNote into a nice .app file that you can put in your Mac’s Dock and launch. When you install WineBottler, you also get a pre-packaged version of Wine called Wine.app that can be used across different WineBottler-wrapped apps or for running other Windows binaries on macOS. This version of Wine isn’t as current as what you’d get from installing via Homebrew and you’re limited to 32-bit Windows apps only, but it’s new enough to include the Mac driver and works perfectly fine with KeepNote. In my testing, it was the easiest, most stable, nicest-looking, and smallest (more on that later) way to run KeepNote in macOS.
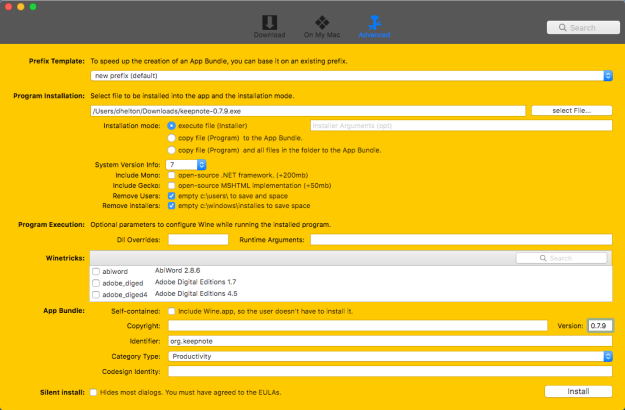
My recommended WineBottler settings
The screenshot above shows my recommended install settings. KeepNote doesn’t require Mono or Gecko, so leave them out and save yourself lots of space.
Once it’s installed, you get a version of KeepNote with it’s own Dock launcher/icon that integrates nicely with macOS, including being able to copy and paste into and out of the app. If you have “Use system tray icon” enabled, it’ll put a little KeepNote icon up in the right side of the Mac’s menu bar, but it doesn’t really do anything so I just disabled it in KeepNote’s “Preferences.”
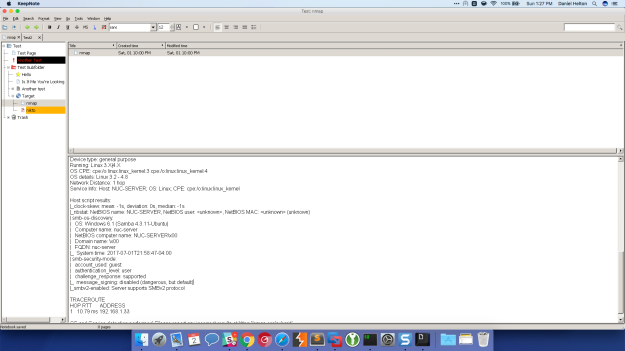
KeepNote running inside it’s own WineBottler wrapper in macOS
So one oddity with the Wine Mac driver is that the stock version leaves the Option and Command keys on a normal Apple keyboard useless. You’d think they’d at least map them to the Alt and Windows (or Super, if we’re being platform-agnostic) key functions or even offer some configuration option. But alas, they don’t. You can do Xmodmap stuff with X11…but then you’d have to use XQuartz.
Fortunately, the Wine.app packaged version that comes with WineBottler maps Command to serve as extra Control keys, so you can use Mac-style shortcuts for copying and pasting. You won’t really miss the Windows key, as KeepNote doesn’t use it from what I can tell. If you want to hack the driver a little and add Option = Alt, check out the last section of this post.
Another nice feature of WineBottler is that it will find the Windows icon and automatically make it the icon for the .app bundle. I also have a nicer-looking (IMHO) version of the KeepNote icon in Mac-compatible .icns format that you can download here.
The Other Easiest (But Not As Nice-Looking) Way: Homebrew and AppleScript
I’m sure you’re no stranger to Homebrew, the excellent macOS package manager. The other super-easy way to run KeepNote is to simple run “brew install wine” and then “wine <the path and filename of your Windows KeepNote installer>” in your terminal.
You can also make a simple launcher using the Script Editor (formerly AppleScript Editor) and choosing to save it as an “Application.” Here’s one I cribbed from the official Wine site.
on run

--edit this to be the correct location and file to run (typically only edit after the "drive_c")

 set toRun to "$WINEPREFIX/drive_c/Program Files (x86)/KeepNote/keepnote.exe"

--edit winePrefix if you are not using the default prefix

 set winePrefix to "$HOME/.wine"

--edit wineLocation if your wine install is not the default location

 set wineLocation to "/usr/local/bin"

--edit dyldFallbackLibraryPath to your X11 lib folder, this one is set for XQuartz on 10.6+

 set dyldFallbackLibraryPath to "/opt/X11/lib"

-------------------------------------------------------

--DO NOT EDIT ANYTHING BELOW THIS LINE

-------------------------------------------------------

 set toRunPath to do shell script "WINEPREFIX=\"" & winePrefix & "\"; TEMPVAR=\"" & toRun & "\"; echo \"${TEMPVAR%/*}\""

 set toRunFile to do shell script "WINEPREFIX=\"" & winePrefix & "\"; TEMPVAR=\"" & toRun & "\"; TEMPVAR2=\"" & toRunPath & "\"; echo \"${TEMPVAR#$TEMPVAR2/}\""

do shell script "PATH=\"" & wineLocation & ":$PATH\"; export WINEPREFIX=\"" & winePrefix & "\"; export DYLD_FALLBACK_LIBRARY_PATH=\"" & dyldFallbackLibraryPath & "\"; cd \"" & toRunPath & "\"; wine \"" & toRunFile & "\" > /dev/null 2>&1 &"

end run
So while doing it this way is nice, easy, and gets you the latest version of Wine available, there is one downside. If you put the launcher in your dock, even if you’ve given it a fancy custom icon instead of the default AppleScript one, Wine will still open as a separate app with it’s own Dock icon. You end up with the same problem if you make the .app bundle in Automator too. Some people might see this as a minor quibble, but it does bug me.
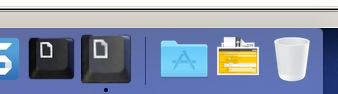
As you can see, the icons are a little redundant
The Easy (But Bloated) Way
Wineskin is another way to package Wine apps so that they integrate more beautifully with the Mac experience, but it has one big disadvantage: it’s enormous! Unlike WineBottler, you can’t externalize the Wine install to use across apps, so every Wineskin-wrapped app has to contain the full install of Wine bundled within it. Also, there didn’t seem to be an easy way to keep it from installing Mono and Gecko with every app (I dug two layers deep into the advanced settings and said, “Fuck it!”). Total all this up and you’ve turned a 30 megabyte app into a 600 MEGABYTE app! The WineBottler-wrapped version, by comparison, is just under 48 MB.
It does offer some deeper customization options than WineBottler, with a lot of different Wine versions and engines to choose from, but even the compressed engines still end up tipping the scales at 300 meg or so. So yeah, if you want nice Dock integration, just stick with WineBottler.
Another Less Bloated (But Unstable) Way
I already use the latest version of Wine pulled from Homebrew and I was kind of ambivalent about having to use the redundant Wine.app just to get a nice Dock launcher. If you open up a WineBottler bundle, the actual binary it executes is just a bash script called “startwine” that looks in a few possible locations for your Wine binary, then uses it to execute the Windows program.
You can easily edit it to point to your Homebrew-installed version of Wine instead (the portion I added is in bold):
#!/bin/bash

BUNDLERESOURCEPATH="$(dirname "$0")/../Resources"

#find wine, try in Bundle, ~/Applications, /Applications, Spotlight
if [ -f "$BUNDLERESOURCEPATH/Wine.bundle/Contents/Resources/bin/wine" ]; then
 export WINEUSRPATH="$BUNDLERESOURCEPATH/Wine.bundle/Contents/Resources"
#adding Homebrew Wine support
elif [ -f "/usr/local/bin/wine" ]; then
 export WINEUSRPATH="/usr/local/var/homebrew/linked/wine/"
elif [ -f "$HOME/Applications/Wine.app/Contents/Resources/bin/wine" ]; then
 export WINEUSRPATH="$HOME/Applications/Wine.app/Contents/Resources"
elif [ -f "/Applications/Wine.app/Contents/Resources/bin/wine" ]; then
 export WINEUSRPATH="/Applications/Wine.app/Contents/Resources"
elif [ -f "$(mdfind 'kMDItemCFBundleIdentifier == org.kronenberg.Wine' | grep -m 1 'Wine.app')/Contents/Resources/bin/wine" ]; then
 export WINEUSRPATH="$(mdfind 'kMDItemCFBundleIdentifier == org.kronenberg.Wine' | grep -m 1 'Wine.app')/Contents/Resources"
else
 echo "Wine not found!"
 exit 1
fi

...
This will run…buuuuuuuuuuuut it tends to be a tad more unstable than usual. It’s especially crash-prone when right-clicking around to change the icons on pages or when resizing the main KeepNote window.
I just wanted to point out that you can easily do it if you wish, but you’re better off sticking with WineBottler’s version of Wine.
Fixing Keyboard Mappings
One last note: if you’re unhappy with the key mappings, it’s not too hard to manually change them with a hex editor. Wine is open source and you could go to the trouble of compiling a new Mac drive, but I find this way easier.
What you want to look for the Mac drive file, you’ll find it in the following locations.
- In the Homebrew version of Wine:
- /usr/local/var/homebrew/linked/wine/lib/wine/winemac.drv.so (32-bit version)
- /usr/local/var/homebrew/linked/wine/lib64/wine/winemac.drv.so (64-bit)
- In Wine.app: /Applications/Wine.app/Contents/Resources/lib/wine/winemac.drv.so
A good post on Stack Overflow explains which values to change in the compiled library. To map the Command keys to be extra Control keys and turn the Option keys into Alts…
The exact address is going to change from version to version, so just look for these values near each other:

And change them to these:

I haven’t messed with it to, perhaps, turn the right Command key into a Windows key, but you could easily do it.
In conclusion, KeepNote runs pretty well inside Wine and is much more usable than running it straight from Python, sadly. It does crash from time to time, but it does that in Linux too and it’s good at autosaving and preventing data loss. The only thing I wish I could do is get the options for opening notes in external text editors, image viewers, etc. to work with my Mac apps…but alas, the Wine pseudo-Windows file paths throw them off.
Hope this post has helped you and enjoy your using KeepNote on Mac!

Maybe this could help to someone else, but there is an easy way to have the copy/paste working in MacOS. The problem seems to be related with MacOs and the different clipboards, so:
– Get KeepNote from Github
– Edit the file: keepnote/gui/richtext/__init__.py
– Find line 91:
if keepnote.get_platform() == “darwin”:
CLIPBOARD_NAME = gdk.SELECTION_PRIMARY
else:
CLIPBOARD_NAME = “CLIPBOARD”
– Comment these four lines and add (no spaces before CLIPBOARD_NAME):
CLIPBOARD_NAME = “CLIPBOARD”
– Problem fixed 🙂
LikeLiked by 1 person
Nice! I’m going to try it out!
LikeLike
This solution is great but it only works for text. Images are not copied over with this.
LikeLike